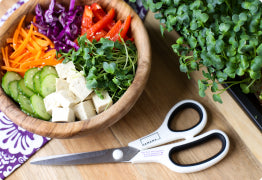
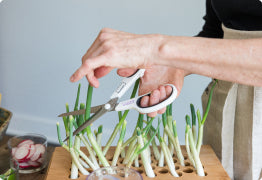
Broccoli microgreens are fairly mild, fresh, & slightly bitter (they taste very much like mature broccoli)! These lil greens are very versatile! They make a great addition or garnish to any dish because they compliment most flavors without overpowering them. Try them on top of pizza, soup, eggs, stir fry & pasta or toss them in a salad, wrap, or smoothie! Let's not forget about the nutritional benefits! Check out our "How to Diversify Food Systems with Broccoli Microgreens" Blog Post for further information. Our hearty broccoli microgreens will be ready for peeling about 5-6 days after planting and will be ready for harvest in about 10 days! They will be about 2.5-4 inches tall, depending on your growing conditions. Oh, and our Hearty Broccoli Seed Quilt seeds are certified organic :D ______________________________________________________________________________________________________ Day 1- Planting your Hearty Broccoli Seed Quilt For setup, just follow the regular simple Hamama instructions like you always do! Here is the electronic version if you need a quick refresher. The initial soak is a very important step in the growing process as it provides the seeds in your quilt with the water to jumpstart the germination process. To ensure that your quilt is adequately soaked, be sure to hold it down long enough (10-30 seconds) for the entire quilt to turn a shade darker. A good trick is to flick the seed quilt! If the seeds roll around in their pods, that is a good sign it is too dry and could soak for just a little longer. After the soak, you want to be sure that the quilt is properly propped on the tray's bottom ribs so that neither side of the quilt is dipping into the water. You also want to be sure the seed pockets are not underwater after the dunk! Here are some extra watering tips! Day 2- No big changes yet! Nothing new on day 2, but I do want to share some important things to take note of! The water level may have gone down significantly from day 1.. That’s totally normal! Our seed quilts and trays are designed to provide the seeds with enough water to last them from day one until harvest day. No need to add additional water at this point! It is always good practice to keep on eye on the water level to be sure it hasn't dropped below the tray's ribs. If it has (drier climates or having the heat on can cause this), just add enough water to bring the level back up to those ribs and no higher as the roots need that air gap to thrive! Keeping your tray anywhere between 60-80 F is best. The warmer they are in that range, the faster they will grow on time with predictable health. Cooler temps will stunt the growth and it'll take a little longer for the seeds to germinate. Curious what that top layer is for? It's important to have a weighted black-out period for the first few days of growing microgreens. The weighted black-out period (seeds held down + darkness) encourages the seeds to send their roots downward, as opposed to growing outward and sending out root hairs to grab moisture from the air. Day 3- Puffed Pockets of Joy As you can see, the Seed Quilt has definitely started to “puff up” a bit fro the growing greens. Right on track! Day 4- A watched Seed Quilt never germinates! :D Perfectly ballooned! You can see that the paper has puffed up and that the germinated seeds are growing. The peel time for the broccoli Seed Quilt is 5-6 days, so I am going to wait another day or two to pull the top paper back. It is important not to peel too early, as tempting as it may be! As the roots begin to grow, they need that top layer to encourage them to penetrate the bottom of the mat. Without it, the roots risk staying above the mat, which would cause them to dry out and die. Not only does the top paper help the roots but it is also super beneficial for the greens themselves! It keeps moisture in from the initial soak, regulates temperature and humidity, and most importantly shields the seeds from harsh light during the germination process! Day 5: Busting Out! Can’t wait to peel tomorrow, on Day 6! I added a touch of water to the side of the tray in order to bring the level back above the tray’s bottom ridges because of the dry air I have right now with my winter heating on. Be careful not to over-water (only ever touch up to the top of the ridges to be sure you’re not over-watering)! As the seeds & their roots grow, they can reach further down to wick up water as needed, and it is important to give them airspace/oxygen to breathe (root respiration!). Day 6- Time to Set These Seedlings Free! Definitely ready to peel the paper top now to give these microgreens the necessary airflow and light they need to continue growing strong! They are pale yellowish green at this stage because the cover has been blocking light out, but they will become a more vibrant green as they receive more light. Broccoli microgreens tend to be greener than most varieties. 💚 If you see any white fuzzies, don’t let them alarm you!! Not sure what this white fuzz is? Learn all about root hairs here! Freshly peeled Broccoli pictured on right Day 7- You Grow Girl! The broccoli microgreens are now measuring just over 2 inches already! Mine have an extreme lean to them right now because they were reaching for sunlight. I try to rotate the tray once a day in order to balance that out :D Day 8- Almost ready to harvest! What a difference 24 hours can make! These are about 3 inches now, super dense, and a vibrant green color. Totally can start sneaking tastes :D Day 10- Hooray Hooray, HARVEST DAY!! For me, these looked perfectly mature on day 10. Rich green color, soft lush leaves, and about 3.5 inches tall. Use this mature height as a general rule of thumb as they will slightly vary by season and your growing environment :) Our system is meant for indoors as that is where you will have the most predictable & constant growing environment. Harsh direct sunlight, strong wind, precipitation, temperature fluctuations, critters, etc outside will not result in predictable growth for the microgreens. The north-woods just made for a really pretty backdrop :D Storing your Broccoli Micros These can be harvested at around 3-4 inches. They can be harvested by cutting or even pulling up, & stored in a ziplock bag (or the Stasher bag) in the fridge for abut 10 days like that. If you prefer to munch on them while they are in the tray, the mature greens can remain there for a few extra days, but please periodically check that they have enough water to drink! Otherwise, they will wilt over from thirst! 😢 Should you rinse your harvested microgreens before use? When the microgreens are ready to harvest you don't need to wash them, but you can if you want. Whatever you feel comfortable with! Since there’s no soil, they’re already super clean. Most folks who do rinse do so if they have pets who might be snooping around in them :D The most important thing you should do for cleanliness is to treat them just like any other food item and always wash your hands when handling! *For longer storage, don’t rinse the harvested microgreens before storing. Instead, put them in your ziplock bag in the fridge & rinse just before eating, if desired! How to Eat your Broccoli Micros Sprinkle your broccoli microgreens on dishes that you love broccoli in!! My personal favorite uses for the Hearty Broccoli microgreens are on eggs, pizza (Woah, I just had a thought- how about on breakfast pizza?! 🍕), loaded baked potatoes, pasta, and smoothies!! Standout Broccoli Micro Recipe 1 - Mushroom Spinach Risotto Standout Broccoli Micro Recipe 2 - Roasted Spaghetti Squash Bolognese Standout Broccoli Micro Recipe 3 - Chickpea "Tuna" Salad Sandwich Caveats Broccoli has an earthy kind of smell - definitely a bit smellier than the rest! So don’t let it alarm you. Kinda like the full grown vegetable though, hey? Broccoli...perhaps the winner for smelliest vegetable!? 🙊 Check out our Hamama broccoli recipes & blog posts here! See what other Hamama Growers are saying about Hearty Broccoli Microgreens As always, leave your thoughts below! 💚 Allie & the rest of your Hamama Team