Have an account?
Log in to check out faster.
Loading...
🌱 Free Shipping on $54+. Some exclusions apply.
Our countertop growing systems take the guesswork out so you can have fresh greens on-hand anytime!
Add Water: Fill the tray with water up to the fill line. You won't have to add water again!
Setup Seed Quilt: Place Seed Quilt® in tray with tan side facing up and brown coconut fiber mat side facing down.
Soak: Press down on Seed Quilt® to evenly wet.
Hold down for 10 seconds letting the Seed Quilt® soak up water, turning a shade darker.
Where to place your grow tray: Anywhere you have space! Indoors is best, so you can grow no matter the season. Avoid placing your grow tray near houseplants that might carry mold or plant disease.
Light requirements: Microgreens don’t need much light, so overhead lighting (like regular ceiling lighting) will work just fine!
Peel the Cover: In about 4-6 days, you will see the sprouting seeds have pushed against Seed Quilt® cover.
If sprouts rip the Seed Quilt® cover, remove the cover pieces.
If sprouts balloon the Seed Quilt® cover, peel off the cover.
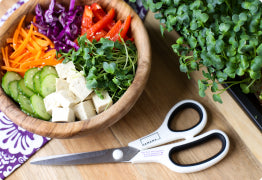
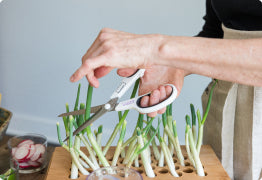
Harvest: To harvest your greens, hold the tops of microgreens with one hand, and with the other hand, cut stems 1/4” above Seed Quilt® with scissors or pull up directly from the Seed Quilt®.
Eat as a hearty salad, blend into a smoothie, or use as a beautiful and healthy garnish.
Compost your leftover Seed Quilt® in your food and yard waste bin.
Storage: For longest lasting microgreens, harvest all at once and place in a Ziploc bag with a dry paper towel inside. They will last a week or more in the refrigerator. If you can’t harvest on schedule, add another cup of water to keep your microgreens from wilting.
Wash: Clean your grow tray with soap and water or place it in the top rack of your dishwasher, facing down.
Plant your next Seed Quilt® so you have weekly harvests ready to eat!
Microgreens and micro herbs are the seedling versions of leafy greens, vegetables, and herbs. They are a few days older than "sprouts".
As shown in a 2012 USDA study and in several studies since, microgreens and micro herbs are extremely nutritious, in some cases up to 40x more nutritiously dense than their mature versions.
Microgreens and micro herbs are very delicate and can even start going bad on supermarket shelves. Growing microgreens in your home means you get the freshest microgreens and micro herbs when you harvest.
When you buy microgreens and micro herbs in a store, you don't have as many choices in what you get. Hamama offers more than 10 different types of microgreens that you can grow yourself.
Hamama's microgreen kits don't use any soil, pesticides, or fertilizers so you can trust that your microgreens and micro herbs are clean and safe to eat. Also, growing microgreens indoors means you don't have to worry about pests eating your greens before you do.
This statement has not been evaluated by the Food and Drug Administration. This product is not intended to diagnose, treat, cure, or prevent any disease. It is recommended that you seek advice from your doctor before giving this product to infants or children and from your veterinarian before giving it to pets.