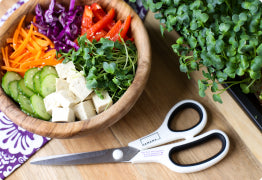
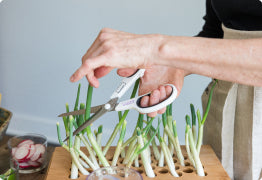
Clover is such a versatile little microgreen! They have beautiful green leaves with a mild, fresh, nutty & sweet flavor. Clover adds a fresh crisp crunch to sandwiches & salads and is very similar to Alfalfa in both flavor & texture. The biggest difference between the two is how much more easily Clover sheds its seed hulls, which is a big reason why we prefer it! These Earthy Clover microgreens will be ready for peeling about 5-6 days after planting and will be ready for harvest in about 8-10 days! __________________________________________________________________________________________________________________ Day 1- Planting your Clover Seed Quilt For setup, just follow the regular simple Hamama instructions like you always do! Here is an electronic version of our instructions if you need a quick refresher. The initial soak is always the most important step in the process as it provides the seeds in your quilt with the water to jump-start the germination process. You want to first add water (filtered is best) to the fill line which is about 3 cups of water. Then you want to add the quilt! To ensure that it is adequately soaked, be sure to hold it down long enough for the quilt to turn a shade darker (10-30 seconds). A good trick is to flick the seed quilt! If the seeds roll around in their pods, that is a good sign it is too dry and could soak for just a touch longer. After the soak, you want to be sure that the quilt is properly propped on the tray's bottom ribs so that neither side of the quilt is dipping into the water. You also want to be sure the seed pockets are not underwater after the dunk! Here are some extra initial soaking & watering tips! Day 2- Nothing much to note yet; Just anxiously awaiting these babies!! You won’t see too much happening on day two but I do want to share some important things to note: -The water level may have gone down from day one. That’s totally normal! Our Seed Quilts and trays are designed to provide the seeds with enough water to last them from day one until harvest day. No need to add additional water at this point! -Another thing to note is the environment where you keep your greens! When referring to temperature, anywhere between 60-80 F is best. The warmer they are in that range, the faster they will grow on time with predictable health. Cooler temps can stunt the growth and it'll take a little longer for the seeds to germinate. Microgreens don't necessarily need a lot of light to grow but will halt if they are too cold so I would prioritize warmth over light! Remember our rule of thumb: if it’s comfy for you, it’ll be comfortable for your little seedlings! Curious what that top layer is for? It's important to have a weighted black-out period for the first few days of growing microgreens. The weighted black-out period is crucial for two reasons - holding the seeds in place and shielding them from light. Holding the seeds down helps keep the seeds in close contact with the moist coconut mat & encourages the seeds to send their roots downward, deeper into the coconut mat. The darkness is important for the first few days so the seeds can germinate, root deeply, and grow to a point where they're ready to start photosynthesis. Day 3- The seeds are germinating nicely! Seeds are starting to germinate! As you can see, the Seed Quilt has started to “puff up” a bit. Right on track! Day 4- Bustin’ out! Perfectly puffed paper! Peel time for this variety is 5-6 days, so I am going to wait another day to peel. They are getting ready to bust out! Day 5: Time to Peel & set these babies free! Definitely ready to peel the paper top now to give these microgreens the necessary airflow and light they need to continue growing strong! You can see the clover seeds have germinated beautifully already! The color right after peeling tends to be more golden/yellow because the greens have not been absorbing light until this point! They will green up quickly after the peel. :D There are two ways in which your Seed Quilt can look at this point, as demonstrated in the image below. This particular Clover Seed Quilt is a good example of a “ballooned” quilt which allows you to just peel the cover off in one motion! Depending on growing conditions, some Seed Quilts will rip through the top layer rather than balloon. All you have to do in that case is remove the pieces individually. If you are curious to see what the ripping looks like in more detail, check out our refreshing cabbage growing diary! Don't be alarmed if you see some fuzzy/furry, white ROOT HAIRS! These are commonly mistaken for mold due to their similar appearance, but they are totally safe & healthy (and way cuter than mold 😉). Root hairs are bright white and always appear to congregate around the root itself. They help the greens grow by giving them nutrients and absorbing water! See what all the Fuzz is about here! Day 6- Aww, so cute and fluffy! I love the dramatic change microgreens undergo a day after peeling the top off! The greens are now measuring about ½-1 inch tall & are super lush. I moved my tray near my succulent for an instagram-worthy picture, 😆 but typically we advise you to keep your grow trays away from other plants or fruit baskets as common molds can sometimes “hop over” onto your microgreens and we don’t want that! Day 7- These bright green beauties are growing up nicely! The greens are now measuring just shy of 1.5 inches. It takes major constraint to not snack on them! They are also shedding their seed hulls nicely! Occasionally, I brush them with my clean hands to shake any stubborn seed shells off too. I strangely love “petting” my clover microgreens, lol! Day 8- Almost ready to harvest! These are almost 2 inches now, which is perfect because Clover does not get much taller than that & that’s why these microgreens are so dense and cute! Notice the lean? I generally rotate my Grow Tray every so often to balance it out. The little micros like to reach for the sunlight! If you have very low light, you will notice "leggier" greens, as they have to stretch very far to look for light! Day 9- HARVEST DAY!!! For me, these looked great on day 9. Bright green, soft plush leaves, and about 2 inches tall. Use this as a general rule of thumb as they will vary by season and your indoor growing environment :) Storing your Clover Microgreens: These can be harvested at around 1.5-2 inches. They can be harvested by cutting or even pulling up, & stored in a ziplock bag (or the Stasher bag) in the fridge for a week or so! If you prefer to munch on them while they are in the tray, the mature greens can remain there for a few extra days, but please periodically check that they have enough water to drink! Otherwise, they will wilt over! 😢 How to eat your Earthy Clover Microgreens: Use Clover Microgreens just as you would use alfalfa!! My personal favorite uses for the Clover Microgreens are for adding a fresh crunch to sandwiches, soups, wraps, chicken salad & leafy salads! Check out all of these other awesome recipes that incorporate these versatile Microgreens! Caveats: Just beware that this variety doesn’t grow up as tall as other varieties. 1.5-2 inches is the perfect mature height for clover microgreens :) Don't forget to check out Clover-related posts on our Hamama Friends Facebook Page!