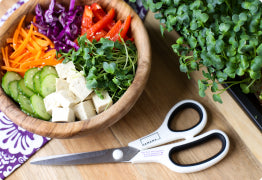
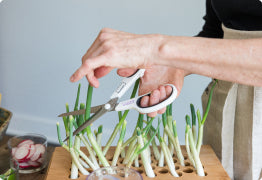
Want to mix up your Hamama harvest? Whether you live alone and consume less, can’t agree on what flavor to plant, or just need a little fiesta in your Hamama tray, here’s a Hamama hack for you! It’s as easy as 1-2-3!
To grow multiple varieties in one tray simultaneously (or to just grow a smaller amount), just carefully cut the Seed Quilt in quarters or halves between the seed cells. You want to be careful to avoid cutting directly into or close to the seed cells.
Ready for some quick math? The 16 cells are best cut the short distance from top to bottom. Here are the fun combos for cutting to mix-and-match:
Onto the best part: choosing your winning combinations! Some of our favorite pairings are:
You’ll want to plant your Seed Quilt pieces at the same time! Why? Great question! The water levels vary throughout the growth cycle as your little greens drink up the water. Also, if you just can’t consume a whole Seed Quilt during each growing cycle, you can always just plant half of one at a time!
As your Seed Quilts grow, you’ll be able to munch on two, three, or four different flavors all from the same tray! No need to fight over which flavor is up next!
Once you’ve cut your Seed Quilt, just tuck the other section(s) (and label!) back into the packaging and save for your next batch! Remember, our ungrown Seed Quilts last well over a year, and the best way to store them is in a cool, dark place like your pantry! 🙂 Cool temps & dry air are best (ideal temperature of 50º F at 50 percent humidity)! Mainly, just watch out for heat/humidity/sunlight exposure while storing as that can lessen the seed’s viability.
Not up for a cutting challenge yet? We also have a Super Salad Mix and a Zesty Mix that include a variety of different seeds in one Seed Quilt! The Super Salad Mix is broccoli, kale, arugula, kohlrabi, cauliflower, and cabbage. The Zesty Mix is the same but with mustard instead of cauliflower!
This is a wonderful idea for a couple of older folks who have a hard time eating a full quilt before it is fully used! Love this idea and offers great variety!
Thank you for a new plan and suggestions that make sense.
Hello Michelle!
Thank you so much for reaching out to us! Yes, you would also cut the coconut mat as well! :) I hope this answered your question. If you have any more questions or concerns, please feel free to reach out to us at hamama.com/help! I hope you have a wonderful day! :)
When you cut the quilts apart, do you cut the base mesh too or just pull the seed quilt part off before cutting?
Hello Dr. Laura!
I am so happy that this blog was helpful – we love hearing this! Happy Growing! :)
wow very helpful info!
Hi Billie!
You would still fill the tray to the fill line (about 3 cups of water) for the initial soak. Make sure your 1/2 quilt is placed properly on the tray’s bottom ribs, near the center of the tray. If you notice that the water level is at or above the Seed Pockets, you can pour a little water out. An ideal level after the initial soak is at or slightly above the middle of the brown coconut mat :) Hope this helps!
When soaking a half bag of greens; how much water should I use?
Although I bought my kit last September, ‘fear of failure’ and a 50+ year history of ‘black thumb’ with houseplants had me procrastinating, even though I am on autoreorder every 35 days. After a discussion of ‘fof’ in several areas, my adult daughter challenged me this past Friday to just do it and report back to her in an hour. I took the crazy way out and started 1/4 tray each of cabbage, clover, daikon radish, and zesty salad mix. Day 3 and they are germinating, puffing up the seed bags! I am very excited and encourage other senior fraidy-cats to just jump in!!
I’m the only to eat the greens, so I would like to only do 1/2 a sheet at a time. Do I still fill the tray full of water or are there other adjustments needed to make sure I get good growth and not overwater? Thanks for your help!
Hi Rhonda!
Wheatgrass makes a great cat grass! We have a blog post about microgreens for dogs & cats that you an check out here: https://www.hamama.com/blogs/hamama-blog/hamama-pets
From our understanding microgreens are safe for cats but please do talk with your vet as well.
Does anyone know which sprouts are safe for a cat to eat?
Hi Susan! The best harvesting practice is to cut (or pull up) all of the mature microgreens & then store what you don’t eat right away in the fridge in a baggie (like the Stasher bag). They’ll last up to 10 days like that!
If you prefer to munch on them while they are in the tray, the mature greens can remain there for a few extra days, but please periodically check that they have a bit of water in the tray to drink! Otherwise, they will prematurely wilt over. The greens may develop a slightly more bitter taste & fibrous texture if you don’t harvest them within 2 weeks.
Hope this helps! :)
I have a question. . . Once the harvest is ready to eat, on the 7th day, how many more days does it stay fresh and edible? Thank you. I love this concept.
Hi Monica!! Thanks so much for your kind feedback – we love hearing this! :D We are so happy you are enjoying your Hamama greens! -Allie :)
I really love these! I first purchased the kit when “Good Morning America”, featured them on “Deals & Steals”, I just ordered another set of quilts. They are easy to grow and delicious. Highly recommend if you are looking for a healthy snack or adding a extra flavor to a salad, sandwich or anything else, I put these on just about anything I’m eating, yummy :-) Awesome product!!!!!!!!!
Comments will be approved before showing up.
Brittany Hamama
January 28, 2022
Hello Fran!
I am so happy that this blog was helpful. It is really nice to have a different variety all in one tray! Happy Growing! :)