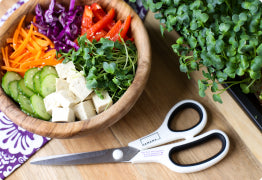
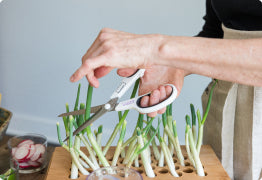
Don't Forget to Check Out Our "Summer Growing Tips" on our YouTube Channel! Click Here! It's that time of the year again - Summertime! As the days are longer, temperatures are warmer, and humidity is up, it’s important to re-calibrate the care we give our microgreens. Think about how you’d apply sunscreen and drink more water during the hotter days - well depending on where you live, your greens might also need a little extra TLC for this hot weather! Let’s take a look at watering, lighting, tray placement, and a few helpful tips to give your greens a healthy growing environment during this warm weather season. 🌞😅 STORING YOUR UNGROWN SEED QUILTS: Our ungrown Seed Quilts less well over a year if stored properly. It is important to think about where you store your quilts in the hot summer months, especially if you have a large supply. The best storage spot for your ungrown Seed Quilts is someplace cool, dry & dark (like your pantry if not too hot/humid in the summertime) If you plan on storing your Seed Quilts for more than 6 months, try storing them in your refrigerator! 🧊 PLANTING YOUR SEED QUILT / INITIAL SOAKING: Both our black plastic and white ceramic grow trays are marked for how much water should be added to initially soak your Seed Quilt. The black Grow Trays should be filled so that the water level reaches the bottom of the fill line and the ceramic tray to the indentation ridge. When filled correctly, the small ridges at the base of the tray should ideally prevent you from completely submerging the quilt while still providing an even soak. When soaking, it is super important to soak the entire Seed Quilt long enough so every pocket turns a shade darker, but afterwards you want to be sure no extra water is left pooling on the top of the quilt. If you notice an excess of water, gently tip your quilt upwards until that extra water runs off into the tray. This ensures all seed pods have enough water to begin germination but that the top is kept dry enough to prevent an overexposure to moisture (which can suffocate those lil seeds)! Be sure your Seed Quilt is evenly propped on the tray’s bottom ribs and not dipping into the water on any edge. The water level after the initial soak should be at the top of the brown coconut mat, and no higher. Pour a little water out of the tray if the water level is reaching the seeds/top paper. TEMPERATURE / WATERING: If the temperature is just a little warmer in your house (are you sweating?!), remember our golden rule “if it’s comfortable for you, it’s comfortable for your plants.”! We recommend anything between 65-85 degrees F. These little greens love warmer temps so no worries there - we just have to be mindful of watering. Please take a peek under your Seed Quilt every so often (typically not necessary before peel day). It's totally normal for the water level to have dropped below the level of the Seed Quilt since your greens have been drinking it up! 💧 If they’ve been thirsty and the roots are almost dry (or the water level has dropped far below the tray’s bottom ribs) add enough water to bring the level up to just above the tray's ribs to make sure your greens don't wilt prematurely! If you live in an area that is a little more humid in the summertime, be sure to limit the number of ways your plant can be over-exposed to moisture such as over-filling the tray, adding more water when not necessary and again keeping the top of the quilt dry! Having a ceiling or oscillating fan running will also be helpful for needed airflow. TRAY LOCATION / LIGHTING: Nothing says BFFs like heat and sunlight! You may be tempted to move your tray to an outdoor area with access to bright direct sunlight but in the case with microgreens this is a no-no. Not only will exposing your delicate little greens to direct sunlight cause them to burn, shrivel and dry out, it may also cause the water in your tray to evaporate much faster therefore throwing off your entire growth cycle! Exposure to indirect sunlight where they can admire the heat from indoors will result in more consistent results. Growing outside will also expose your delicate greens to travelling molds, pesky critters, strong winds, high humidity, temperature swings, and precipitation. Oy! KEEPING PESKY CRITTERS AT BAY: We all know what a downfall of summer is though... Those pesky little bugs that make their way into our homes! We wrote a whole blog post on this subject and the best way to keep them away from your greens. You can check it out here! The best way to keep them away from your greens is to get them to go to somewhere they love more like a glass of vinegar, honey or even wine. Controlling the fruit fly/gnat population in your home before planting your Seed Quilt is also very helpful! Keeping your tray outdoors or in screened-in porches, having higher humidity (a fan will help!), and placing your tray near fruit/veggie baskets can all contribute to these critters being more attracted to your grow tray. MICRO-GARDENING / REPURPOSING YOUR SEEDS: Summer is the perfect time to explore your outdoor gardening skills and what better way to do that then with greens you are already familiar with! Did you know the seeds in your quilt have the potential to become baby greens / adult veggies!? We’ve had so many users reach out to us with their success stories on transforming their microgreens into macro-greens! Give it a shot - Especially if you fall prey to some of these summer mistakes and aren’t able to get your greens to grow in your tray. These are leftover Hamama seeds! 🠉 Thanks for sharing, Nicole! * EXTRA TIPS! * Grow Tip #1: Begin checking the roots at peel day to make sure they haven’t dried out! If this is the case, just add a little bit of water to the bottom of the tray. Avoid adding water directly on top of the Seed Quilt. Grow Tip #2: If you miss tip #1 and happen to wake up to your greens wilted, take a deep breath! It will be okay! Just add a cup of water to the bottom of the grow tray as soon as you can and they will perk back up. Grow Tip #3: Keep your tray in an area that receives less than 2 hours of direct sunlight per day. Indirect sunlight during the day is great! This just means placing your grow tray on a table near a window rather than right in the windowsill if the area gets a full day of direct sunlight. With these small adjustments in how you care for your microgreens, you will continue to have abundant and healthy harvests for all of your summertime smoothies, salads and more! We hope you all have a fun and enjoyable summer, Hamama Friends! Stay safe! Much love from your Hamama Team :) Grow with us this summer! GROW MICROGREENS TODAY