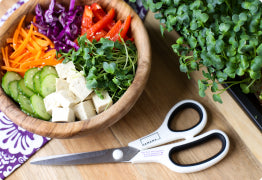
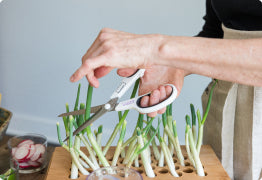
A new, Limited Edition Seed Quilt Flavor is here!! Orange you glad? … We’re so excited to announce the arrival of Crisp Carrot Microgreens! 🥕🥕 Appearance: 🌱 FInely textured, delicate leaves 🌱 Texture similar to dill (bushy) 🌱 LIght green in color Flavor Profile: 🌱 Mildly sweet carrot flavor 🌱 Refreshing & slightly earthy Nutritional Highlights: 🌱 Excellent source of Antioxidants¹ 🌱 Excellent source of Vitamin A¹ 🌱 Boosts the Immune System¹ 🌱 High in Carotenoids¹ 🌱 Skin & Hair growth / strength¹ 🌱 Rich Source of Potassium¹, magnesium, calcium & iron 🌱 Source of vitamin B complex & vitamin D Carrot microgreens can be enjoyed raw as a garnish to sandwiches, salads, wraps, pasta dishes, omelets or whatever else you can think up! They can also be used to make a sweet superfood smoothie or a bright and fresh pesto! This microgreen variety is definitely one you’ll want on-hand at all times, and these can definitely be tough to find in your grocery store, so grab an extra grow tray and get growing! We’ve put together some delicious recipes using our crisp carrot microgreens in our FREE Recipe eBook...Be sure to download it and give them a go! We know you’ll 💚 them! Recipe eBook Sneak Peek: “Carrot Cake” Superfood Smoothie Carrot-Bacon Avocado Toast Carrot Microgreen Salad with Almonds & Cherries Roasted Red Pepper & Tomato Bisque with Smoked Gouda Creamy Carrot Pasta Carrot & Pea Risotto Onto the growing process! Let’s unwrap these beauties and get to planting. via GIPHY Here are a few things you should know before you grow: The peel time is around 8-10 days after the initial soak The grow time is around 14-20 days Their height is about 2-3 inches tall when ready to harvest Intermediate Grower Watch the soak and water level - these are very small seeds so you want to be careful of over-soaking. Fill your tray to a little below the initial fill line on your tray. Soak the Seed Quilt as normal, making sure the top layer turns a shade darker from absorbing water. Gently lift the seed layer of the quilt and let water drip off of it for a few seconds. Reattach the seeds onto the coconut mat in the tray. The water level should remain around the bottom half of the coconut mat for the first few days, slowly receding. Due to the longer peel time, you want to be sure the seeds aren’t over-soaked or over-watered to avoid potential mold from forming. Due to the longer grow time, you may need to check in on the water level more often to be sure the tray doesn’t go dry. If you need to add water, just bring the level back up to the bottom of the coconut mat and avoid pouring water directly over the seeds.Try to keep the tray in a darker (but not cold) area for the first week for better germination (or cover the tray slightly with a book or magazine, still allowing for airflow). After peeling the top paper, supply the microgreens with plenty of sunlight / light & warmth for better & faster germination. Carrot microgreens like a lot of consistent light. You can also use a heat mat to speed up the germination process. If you are growing in the colder months or in a colder climate, check out our Cold Weather Growing Tips! Seed Hulls: Carrot Microgreens naturally have some of their seed hulls attached when finished growing. Although they are completely edible and pretty tiny, if you are not a fan of them there are some ways you can encourage them to fall off. Brushing your hand over the top of the greens as they are growing or even supplying the greens with an extra light source after the peel to encourage the seeds to open a little more Day 1 - Planting the Seed Quilt: Just follow the simple Hamama instructions & check out our YouTube channel for some great tips and tricks to ensure a perfect harvest! This video demonstrates how to soak your Seed Quilt for optimal and even germination! via GIPHY Give your Seed Quilt a quick shake to evenly distribute the seeds, add water to just a bit below the fill line on your tray, then set the quilt on the tray’s bottom ribs. To ensure that it is adequately soaked, press it down long enough for the entire quilt to turn a shade darker. After the soak, you want to be sure that the quilt is properly propped on the tray's bottom ribs so that neither side of the quilt is dipping into the water. You also want to be sure the Seed Quilt is not sloshing around in the water (pour some out if this happens) and that no water is left pooling on top of the seeds. Here are some extra watering tips! Day 2 - You won’t see much happening on day two but there are some things to note: -The water level may have gone down from day one. That’s normal (and good)! Our Seed Quilts and trays are designed to provide the seeds with enough water to last them from day one until harvest day. No need to add additional water at this point. -Another thing to note is the environment where you keep your greens! When referring to temperature, anywhere between 65-80 F is best. The warmer they are in that range, the faster they will grow on time with predictable health. Cooler temps can stunt the growth and it'll take a little longer for the seeds to germinate. Microgreens don't necessarily need a lot of light to grow (especially pre-peel) but will halt if they are too cold so I would prioritize warmth over light! Remember our rule of thumb: if it’s comfy for you, it’ll be comfortable for your little plant babies! Curious what that top layer is for? It's important to have a weighted black-out period for the first few days of growing microgreens. The weighted black-out period (seeds held down + darkness) encourages the seeds to send their roots downward, as opposed to growing outward and sending out root hairs to grab moisture from the air. Day 3 - Not many changes to note here yet! With our other Seed Quilts, you will commonly see some germination by day 3 or so, but hold tight for the carrots! :D You may see that the top paper is puffing just slightly. Day 4 - Still Cookin! You should notice even ballooning across the Seed Quilt more and more each day from the seeds germinating! Day 5 - You may see that the top paper is puffing just slightly. That’s a good sign of germination! At this point, they are starting to set their roots down into the coconut mat. It’s too early to peel but it’s exciting to see these little seeds grow! Day 6 - You should notice that the seeds are germinating under the top paper - you might even see some green! We want to make sure we don’t open these before they have finished “cooking” so we are going to give it another day or two to balloon entirely before peeling the top layer off. It is super important not to peel too early! As the roots begin to grow, they need that top layer to encourage them to penetrate the bottom of the mat. Without it, the roots risk staying above the mat, which would cause them to dry out. Not only does it help the roots but it is also super beneficial for the greens themselves! It keeps moisture in from the initial soak, regulates temperature and humidity, and also shields the seeds from light during the germination process! Day 7 - Getting closer to peel time! AM & PM photos :D Day 8 - What a difference a day makes! Some of the carrot microgreens have sprung up and have made huge progress in ballooning and ripping through the top paper. I waited until the next morning to peel, when every pocket was on the same page :D Day 9 - PEEL DAY! Each pocket of the Seed Quilt has evenly ballooned and the shoots are now breaking through the top paper. Totally ready to peel! This particular Carrot Seed Quilt is a great example of a ballooned & partially ripped Seed Quilt. If your Seed Quilt is ballooned, you can just peel the cover off in one motion! Some quilts will have microgreens that rip through the top layer rather than balloon. All you have to do in that case is remove the pieces individually. Day 10 - Soaking in the sun! The slower seeds have caught up to the rest and there is even growth across the entire Seed Quilt. Now that your greens aren’t hiding under that top layer, you can see just how much they grow day to day! They will also turn greener as they absorb more light. As the greens get bigger they also tend to take up a lot more water. That makes this the perfect time to check the water level of your greens, especially if you live in a drier climate! If you notice that the water level has gone below the halfway point of the fill line and bottom of your tray, you can add enough water to reach the ridges at the base of the tray. This gives those roots enough water to sustain the greens without over-watering them! *Remember, this only applies to dry or really hot growing conditions - the normal function is that you just add water once! :) Day 11 - Day 12/13/14 - For a general rule of thumb, your Carrot microgreens will range from 2-3 inches tall at maturity. Just like any other microgreen though, this is just a reference as growing conditions (light, temp, etc) will affect the mature height slightly. You can continue to let them grow in the tray for a few more days, making sure the water in the tray doesn’t go dry. Harvesting & Storing your Crisp Carrot Microgreens Your microgreens can be harvested by cutting at the base & storing them in a glass Tupperware or Stasher Bag in the fridge. They will last for about 10 days that way! If you prefer to munch on your greens while they are in the tray (you know I do), the mature greens can remain there for a few extra days, but you must periodically check that they have enough water to drink! Otherwise, they may prematurely wilt over from thirst. The greens can also become slightly bitter and more fibrous the longer you leave them in the tray after maturing. Check out our YouTube episode on Harvesting your Microgreens! * Make harvesting & storing your homegrown greens a breeze! The Hamama Harvesting Kitincludes a reusable Stasher Bag®, cute branded harvesting scissors, and natural fiber bamboo scrub brush for cleaning your grow tray! @hamama_greens Harvesting Day💜✂️🌱 Do you need to rinse your microgreens before use? When the microgreens are ready to harvest you don't need to rinse them, but you can if you want. Whatever you feel comfortable with! Since there’s no soil, they’re already super clean. Most folks rinse if they have pets who may have been snooping around in them :D *For longer storage, don’t rinse the harvested microgreens before storing. Instead, rinse just before eating, if desired! What's next? After harvesting your greens, you can compost or re-purpose the used coconut mat! Learn how to Upcycle your Coconut Mats here! Then, you can give your grow tray a quick wash & plant your next Seed Quilt! Learn how to wash your grow tray here. 🥕 We hope you LOVE the newest member of your Hamama family - Crisp Carrot 🥕 Let us know what you think in the comments below! Sources: Soak And Soil. (2022, February 1). How to grow Carrot Microgreens (+benefits, FAQ, pests). Soak And Soil. Retrieved March 30, 2022, from https://soakandsoil.com/carrot-microgreens-how-to-grow-benefits-faq-pests/ Make this recipe today! Get Started Growing Shop Grow Kits Microgreen Kit Microgreen Kit with Bamboo Frame Microgreen Kit - Ceramic Edition Green Onion Kit