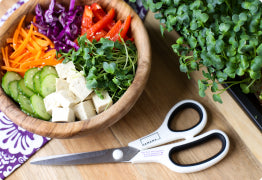
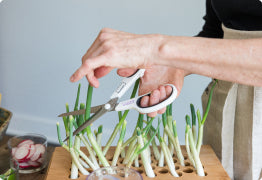
You asked....We delivered!!! Please welcome the newest member of the Hamama Family, Culinary Cilantro!! Cilantro is our very first herb-microgreen with a citrusy, savory, aromatic and slightly sweet taste. Why eat cilantro microgreens over mature cilantro?? In its micro form, cilantro is packed with lots of vital nutrients and antioxidants such as vitamin C, vitamin K, vitamin E & carotenoids¹. Cilantro microgreens are also a great source of beta-carotene (provitamin A), with about 3 times more provitamin A than mature cilantro!² Since vitamin A itself is mostly obtained from eating fatty meats, fish or dairy, those of us trying to minimize or replace meat and fish in our diets can really benefit from regularly consuming cilantro microgreens to boost our intake of provitamin A. To help your body absorb this fat-soluble provitamin, remember to add a few drops of delicious extra virgin olive oil to your microgreens! Cilantro microgreens are also an excellent source of lutein and zeaxanthin, which play important roles in eye health.³ In fact, cilantro microgreens contain more of these vision-sparing nutrients than spinach (another good source), and are nearly 11 times richer in lutein and zeaxanthin than mature cilantro.² In summary, cilantro microgreens will not only boost flavor by adding that citrus-y tang so essential to many beloved dishes, but will also give you a much bigger-than-expected dose of multiple health promoting goodies. Score!! We love cilantro microgreens on just about everything! They are an especially delicious addition to salsas, sauces and dips, and are the perfect complement to Asian, Caribbean, Indian, and Mexican cuisines. This variety is definitely one you’ll want as a constant in your growing rotation, so grab an extra grow tray and get growing! We put together some of our absolute favorite recipes using this micro-herb in our FREE Recipe eBook...Be sure to download it and try them out! We know you’ll 💚 them! Here’s a sneak peek of our fave recipes using our new Culinary Cilantro Microgreens!: Fragrant Coconut Rice | Triple Citrus Mojo Sauce | Silky Carrot Cilantro Soup | Egg Salad with Avocado and Cilantro Microgreens | Ceviche with Shrimp and Cilantro Microgreens | Cilantro Lime Salmon | Creamy Cilantro Pesto Pasta with Scallops | Stuffed Poblano Peppers with Cilantro Cream Sauce | Detox Cilantro Smoothie ….Is your mouth watering yet? :D Onto the growing process! Let’s unwrap these beauties and get to planting. As our first micro-herb Seed Quilt, here are a few things you should know before you grow: The peel time is around 7-8 days after the initial soak (a tad longer than your typical Hamama Microgreen Quilt)! The grow time is around 10-12 days (again, expect a tad longer than your typical Seed Quilt!) Cilantro seeds naturally have lower germination rates than some of our other Seed Quilt flavors, so don’t be surprised if you see lots of unsprouted seeds. We’ve given you larger seed pockets and more seeds so you can have a happy & lush harvest! Pro Tip: Save your leftover unsprouted seeds after you harvest and plant them in some soil! Bonus!! Check out our micro-gardening blog post for more info. You may see some seeds stuck on top of the grown cilantro microgreens - these are the “hull” and this is normal! If you prefer to remove them, you can soak and move the greens around in a bowl of cool water after harvesting. This should make most of the seeds detach. Properly dry the greens on a paper towel after removing from the water then use or store as desired! Another tip for removing them is to “pet” the tops of the greens to loosen occasionally. Ensure your hands are washed when handling, just like any other food item! These micro-herbs will grow to be about 3-4 inches tall at maturity when ready to harvest (this is a rule of thumb as different growing conditions may affect this slightly). Day 1 Planting the Seed Quilt - Whoo Hoo! Just follow the simple Hamama instructions & check out our YouTube channel for some great tips and tricks to ensure a perfect harvest! This video demonstrates how to soak your Seed Quilt for optimal and even germination! Follow along on my cilantro test for more tips on how to grow your Cilantro Microgreen Seed Quilt perfectly. You’ll notice that the seed pockets are larger and we’ve packed a lot of seeds in each one! Give your Seed Quilt a quick shake to evenly distribute the seeds, add water to the fill line on your tray, then set the quilt on the tray’s bottom ribs. To ensure that it is adequately soaked, be sure to hold it down long enough for the quilt to turn a shade darker. A good trick is to flick the Seed Quilt! If the seeds roll around in their pods, that is a good sign it is too dry and could soak for just a little longer. After the soak, you want to be sure that the quilt is properly propped on the tray's bottom ribs so that neither side of the quilt is dipping into the water. You also want to be sure the seed pockets are not under water after the dunk and that no water is left pooling on top of the seeds. Here are some extra Watering Tips! Day 2 You won’t see much happening on day two but there are some things to note: -The water level may have gone down from day one. That’s totally normal! Our Seed Quilts and trays are designed to provide the seeds with enough water to last them from day one until harvest day. No need to add additional water at this point. -Another thing to note is the environment where you keep your greens! When referring to temperature, anywhere between 65-80 F is best. The warmer they are in that range, the faster they will grow on time with predictable health. Cooler temps can stunt the growth and it'll take a little longer for the seeds to germinate. Microgreens don't necessarily need a lot of light to grow (especially pre-peel) but will halt if they are too cold so I would prioritize warmth over light! Remember our rule of thumb: if it’s comfy for you, it’ll be comfortable for your little plant babies! Curious what that top layer is for? It's important to have a weighted black-out period for the first few days of growing microgreens. The weighted black-out period (seeds held down + darkness) encourages the seeds to send their roots downward, as opposed to growing outward and sending out root hairs to grab moisture from the air. Day 3 Not many changes to note here yet! With our other Seed Quilts, you will commonly see some germination by day 3 or so, but hold tight for the Cilantro! :D You may see that the top paper is puffing just slightly. Day 4 Still Cookin'! You should notice even ballooning across the Seed Quilt more and more each day from the seeds germinating! Day 5 Rip-Roaring to go! Each pocket of the Cilantro Seed Quilt is evenly ballooning, and slightly tearing open in this case on one of the corner pockets. It’s definitely too early to peel but it’s exciting to see these little seeds grow! At this point, they are starting to set their roots down into the coconut mat. Day 6 Getting closer to peel time! We want to make sure we don’t open these before they have finished “cooking” so I am going to give it another day or two to balloon entirely before peeling the top layer off. It is super important not to peel too early! As the roots begin to grow, they need that top layer to encourage them to penetrate the bottom of the mat. Without it, the roots risk staying above the mat, which would cause them to dry out. Not only does it help the roots but it is also super beneficial for the greens themselves! It keeps moisture in from the initial soak, regulates temperature and humidity, and also shields the seeds from light during the germination process! Day 7 What a difference a day makes! The cilantro microgreens have sprung up and have made huge progress in ballooning and ripping through the top paper. I will wait one more day to peel, when every pocket gets on the same page :D Day 8 PEEL DAY - YAY! I'm ready to let these babies breathe and absorb light. This particular Cilantro Seed Quilt is a great example of a ballooned and ripped Seed Quilt. If your Seed Quilt is ballooned, you can just peel the cover off in one motion! Some quilts will have microgreens that rip through the top layer rather than balloon. All you have to do in that case is remove the pieces individually. Day 9 Now that your greens aren’t hiding under that top layer, you can see just how much they grow day to day! They will also turn greener as they absorb more light. As the greens get bigger they also tend to take up more water. That makes this the perfect time to check the water level of your greens, especially if you live in a drier climate! If you notice that the water level has gone below the halfway point of the fill line and bottom of your tray, you can add enough water to reach the ridges at the base of the tray. This gives those roots enough water to sustain the greens without over-watering them! *Remember, this really only applies to dry or really hot growing conditions - the normal function is that you just add water once! :) Day 10 For a general rule of thumb, your Cilantro Microgreens will range from 3-4 inches tall at maturity. Just like any other microgreen though, this is just a reference as growing conditions (light, temp, etc) will affect the mature height slightly. A reminder that you may see some seed hulls stuck to the tops of the greens which is normal! If you prefer to remove them, you can soak and move the greens around in a bowl of cool water after harvesting. This should make most of the seeds detach. Properly dry the greens on a paper towel after removing from the water then use or store as desired! Another tip for removing them is to “pet” the tops of the greens to loosen occasionally. I’ve been sneaking tastes since day 8 because THEY ARE SO GOOD! Harvesting & Storing your Culinary Cilantro Microgreens Your microgreens can be harvested by cutting at the base & storing them in a glass Tupperware or Stasher Bag in the fridge. They will last for about 10 days that way! If you prefer to munch on your greens while they are in the tray (you know I do), the mature greens can remain there for a few extra days, but you must periodically check that they have enough water to drink! Otherwise, they may prematurely wilt over from thirst. The greens can also become slightly bitter and more fibrous the longer you leave them in the tray after maturing. Check out our YouTube episode on Harvesting your Microgreens! * Make harvesting & storing your homegrown greens a breeze! The Hamama Harvesting Kit includes a reusable Stasher Bag®, cute branded harvesting scissors, and natural fiber bamboo scrub brush for cleaning your grow tray! @hamama_greens Harvesting Day💜✂️🌱 Do you need to rinse your microgreens before use? When the microgreens are ready to harvest you don't need to rinse them, but you can if you want. Whatever you feel comfortable with! Since there’s no soil, they’re already super clean. Most folks rinse if they have pets who may have been snooping around in them :D *For longer storage, don’t rinse the harvested microgreens before storing. Instead, rinse just before eating, if desired! What's next? After harvesting your greens, you can compost or re-purpose the used coconut mat! Learn how to Upcycle your Coconut Mats here! Then, you can give your grow tray a quick wash & plant your next Seed Quilt! Learn how to wash your grow tray here. We hope you LOVE the newest member of your Hamama family - Culinary Cilantro! Let us know what you think in the comments below 💚 Shop Hamama Kits Cilantro Starter Kit $39+ Free Shipping Cilantro Refill $21+ Free Shipping Microgreen Starter Kit $35+ Free Shipping Green Onion Kit $49 + Free Shipping GET YOUR CILANTRO KIT TODAY GROW CILANTRO MICROGREENS NOW Sources: Xiao, Z., Lester, G. E., Luo, Y., & Wang, Q. (2012). Assessment of vitamin and Carotenoid concentrations of Emerging food products: Edible microgreens. Journal of Agricultural and Food Chemistry, 60(31), 7644–7651. https://doi.org/10.1021/jf300459b Xiao, Zhenlei, et al. “Assessment of Vitamin and Carotenoid Concentrations of Emerging Food Products: Edible Microgreens.” Journal of Agricultural and Food Chemistry, vol. 60, no. 31, 2012, pp. 7644–51. Crossref, doi:10.1021/jf300459b. Ma, L., & Lin, X.-M. (2010). Effects of lutein and zeaxanthin on aspects of eye health. Journal of the Science of Food and Agriculture, 90(1), 2–12. https://doi.org/10.1002/jsfa.3785