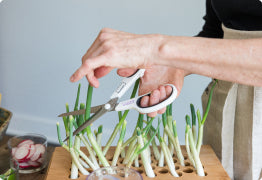
Our Sweet Wheatgrass can be described as mild, sweet, & well, "grassy." It is truly a grass and therefore is quite fibrous. Thus, it is best for juicing, blending in smoothies, or drying into a powder. You can also share your wheatgrass with your cat / pets if you are feeling generous! :D Munching on wheatgrass helps with cats' digestive issues and helps with fur balls. Our Sweet Wheatgrass Seed Quilts are made with organic seeds too - SWEEEEEEET! Fun Fact 1: The wheatgrass microgreens do not have gluten when it grows in the 10-12 day period before harvest. Only the seed itself contains gluten. Fun Fact 2: Wheatgrass is our one variety that can produce a 2nd crop! You can keep your Wheatgrass Seed Quilt in the tray after you harvest the first time. Just change swap out for fresh water (the water level should be around the tray's bottom ribs). The 2nd crop may be a little more fibrous & not as tall as the 1st, but give it a shot and decide if you think it is worth it! :D Your Sweet Wheatgrass will be ready to peel in about 3-4 days from its initial soak and are typically ready to harvest in about 10 days! Your wheatgrass will be about 8-10 inches tall when it reaches maturity. __________________________________________________________________________________________________________ Day 1 - Slam Dunk! For setup, just follow the regular simple Hamama instructions like you always do! Here is an electronic version of our instructions if you need a quick refresher. The initial soak is always the most important step in the process as it provides the seeds in your quilt with the water to jumpstart the germination process. You want to first add water (filtered is best) to the fill line which is about 3 cups of water. Then you want to add the quilt! To ensure that it is adequately soaked, be sure to hold it down long enough for the quilt to turn a shade darker (Since wheatgrass seeds are larger, they can stand for a bit longer of an initial dunk, so about 30-60 seconds). After the soak, you want to be sure that the quilt is properly propped on the tray's bottom ribs so that neither side of the quilt is dipping into the water. You also want to be sure the seed pockets are not underwater after the dunk! Here are some extra watering tips! Day 2 - Something is Cookin' You may see some action already on day 2 with wheatgrass! I also want to share some important tips:: -The water level may have gone down significantly from day 1. That’s totally normal! Our Seed Quilts and trays are designed to provide the seeds with enough water to last them from day one until harvest day. No need to add additional water at this point! -Another thing to note is the environment - Keeping your tray anywhere between 60-80 F is best. The warmer they are in that range, the faster they will grow on time with predictable health. Cooler temps can stunt the growth and it'll take a little longer for the seeds to germinate. Remember our rule of thumb: if it’s comfy for you, it’ll be comfortable for your little plant babies! Curious what that top layer is for? It's important to have a weighted black-out period for the first few days of growing microgreens. The weighted black-out period (seeds held down + darkness) encourages the seeds to send their roots downward, as opposed to growing outward and sending out root hairs to grab moisture from the air. Day 3 - Baby Grass! As you can see, the Seed Quilt has started to “puff up” a bit and you can see the cute little germinated seeds. Some little blades of grass are peeking through! Right on track. Day 4 - I am Peely Excited! The top paper is now fully ballooned! At this point, I remove the paper top so that the greens can get the airflow and light they need to continue growing up strong! This typically happens already on day 3 or 4 for Wheatgrass, as noted on it's unique card label. The color is yellowish-green and some seeds have yet to germinate. No worries - They will green up fast now that they can absorb light! The Grand Reveal!! :D There are actually two ways to peel depending on how your greens grow! In this case, my wheatgrass did not break through the paper besides a few blades, so I was able to remove the top paper in one swift peel. Ohhhh so satisfying :) Day 5: Can't Stop, Won't Stop This Sweet Wheatgrass isi now measuring at about 4 inches tall above the Seed Quilt! I carefully added a touch more water (about 1 cup) at this point because the dry heat in my house has been depleting the water faster than normal. This is really only necessary in the winter or if you live in a desert area with especially dry air. Let's take a look at these fuzzy/furry, white ROOT HAIRS! These are commonly mistaken for mold due to their similar appearance, but they are totally safe & healthy (and way cuter than mold 😉). The more densely packed the seeds, the less air that circulates around the individual blades of grass. Root hairs are bright white and always appear to congregate around the root itself. They help the greens grow by giving them nutrients and absorbing water! Read more about root hairs here! Day 6- Oh My Greens! The Wheatgrass is now measuring just shy of 6 inches & it has much more dense. Still has a ways to go, but it is well on its way! Day 7- All Rainbows & Sunshine Day 8- It's a Jungle Out There Day 9- Time to Sneak A Taste... Day 10- Time to Mow the Lawn! Healthy roots, healthy wheatgrass! At the 10-day mark, this is what your wheatgrass roots should look like. 🌱 Storing your Sweet Wheatgrass: Image from Becky Lowell, Hamama Friends Member Your wheatgrass can be harvested by cutting at the base & storing in a glass Tupperware or Stasher Bag in the fridge. It will last for about 10 days that way! You can definitely keep them in your tray for a bit longer for cute decoration or for your cat to munch on from there. Be sure that it has enough water to drink! Otherwise, it may prematurely wilt over from thirst. Make harvesting & storing your homegrown greens a breeze! The Hamama Harvesting Kit includes a reusable Stasher Bag®, cute branded harvesting scissors, and natural fiber bamboo scrub brush for cleaning your grow tray! Do you need to rinse your microgreens before use? When the microgreens are ready to harvest you don't need to rinse them, but you can if you want. Whatever you feel comfortable with! Since there’s no soil, they’re already super clean. Most folks rinse if they have pets who may have been snooping around in them :D *For longer storage, don’t rinse the harvested microgreens before storing. Instead, rinse just before eating, if desired! What's next? After harvesting your greens, you can compost or re-purpose the used coconut mat! Learn how to Upcycle your Coconut Mats here! Then, you can give your grow tray a quick wash & plant your next Seed Quilt! Learn how to wash your grow tray here. 🌱 How to Use your Sweet Wheatgrass Microgreens: Chances are you're growing wheatgrass because you're a fan of wheatgrass shots in the morning! One Sweet Wheatgrass Seed Quilt grows enough for about one shot! Below are some other fun options! No Juicer? Learn how to make Wheatgrass Powder! Impress with this healthy Sweet Wheatgrass Sorbet! No juicer required. Lucy loving her Hamama Sweet Wheatgrass :D It is a great animal grass! Caveats: Wheatgrass seeds are especially large and therefore may need a slightly longer soak/press so the seeds really have a chance to absorb enough water (just be sure that every section turns a shade darker from absorbing water). And since it is a true grass, wheatgrass thrives with lots of warmth, sunlight, and water (just make sure the water in the tray doesn't go dry but do not bring the level all the way back up to the fill line as the roots need an air gap / oxygen to thrive). Check out how Hamama Growers are using our Sweet Wheatgrass Microgreens! Hope you find some fun uses for your Sweet Wheatgrass Microgreens! They make really cute decoration too :D Let us know what you think in the comments below! 💚 Allie & the rest of your Hamama Team