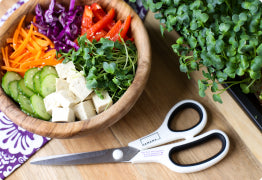
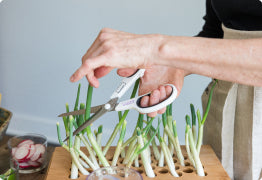
Hey Hamama Friends!! As we grow our microgreens in cooler temps and potentially drier air, we may need to be a bit more mindful in caring for them, Generally, while the germination period does not require light, it does require some warmth. The ideal temperature that most seeds need to germinate best is around 70 degrees F. Temperatures in the outer limits for microgreen seeds range from about 60-85 degrees. The warmer it is in that range, the faster and more consistently they will grow on time with predictable health. If the temperature falls in the lower end of that range, the growth may be slightly delayed and less consistent. TIPS & THINGS TO BE MINDFUL OF 1. LOCATION, LOCATION, LOCATION! During winter, if your house temperature is on the lower end, you can promote germination by moving your grow tray to a warmer location in the house. This could mean moving the grow tray away from a windowsill if there is a cold draft, or moving the tray near a heat source. You can also create a barrier from the cold surface (counter top, etc) by placing a flat towel/mat under the grow tray (make sure the tray is still level!). Some folks have found that the top of the refrigerator is an ideal & warm spot for the grow tray during the germination process: 2. WATERING When planting your Seed Quilt, it may be helpful to switch to cool / room temperature filtered water rather than cold. If you have the heat on in your house, creating a drier climate, please take a peek under your Seed Quilt every so often (post peeling your Seed Quilt cover). It's normal for the water level to have dropped below the level of the Seed Quilt since your greens have been drinking it up! 💧 However, if it looks like it's almost dry please give your greens a little extra love.Add just enough water to bring the level up to just above the tray's ribs. Never refill to the fill line and avoid pouring water directly over the Seed Quilt. * Check out our watering tips! *If you think your Seed Quilt has been under or over-soaked, find tips on how to reset it here! Watering Tips & Saving Ungerminated Seeds - Check out our YouTube Channel Here! 3. A BIT OF PATIENCE While typically the Seed Quilts will be ready for harvest within 7-10 days of planting, you might see some slight fluctuations as they are living plants. The specific variety you are growing along with your specific growing environment can play a role in the length of time it takes for your microgreens to germinate and then reach maturity. It is always best to make decisions based on the appearance of your greens rather than the amount of time that has passed. This is especially important during cooler temperatures because the cold can delay the normal growing period by 3-4 days. Peel TIme: Estimated peel times are noted on each Seed Quilt’s individual label. The biggest thing to look for is that the top paper is ballooned or ripped from the seedlings growing! If your Seed Quilt does not look like either of the images below, it is not quite ready to peel! If you do not notice any germination or ballooning by day 4 or so, the quilt may have been over or under soaked at setup. You can send a photo of your Seed Quilt to us here or check out our Hamama Hacks on the blog for more guidance! Examples: Close, but not quite ready! Needs another day or 2 Close, but not quite ready! Needs another day or 2 Full, even ballooning - Ready to peel! Fully ripped from the growing greens - Ready to peel! Harvest Time: The mature height of the microgreens depends on the variety and your growing conditions. We have pictures of our mature greens here for reference! For a general rule of thumb, microgreens will range from 1.5-4.5 inches. Our Clover, Kale, and Wasabi Mustard tend to hang in the 1.5-2.5 inch range. The remaining varieties tend to be in the 3-4.5 inch range (besides wheatgrass, as that gets to about 10 inches). This is just a reference as growing conditions (light, temp, etc) will affect the mature height slightly. Follow along with our growing diaries on the blog for step-by-step instructions and photos! 4. LIGHTING Microgreens grow great in low light so you can place them in a windowsill (avoid this if there is a cold draft) or just in a room with regular indoor ceiling lighting! Just remember to keep them away from other house plants or fruit baskets. If desired, you may also supplement with a desk lamp, after peeling the top paper, to give them the photons they desire. This addition would let them bush out a bit more and the cotyledons (first leaves) to really enlarge. It's important to have a weighted black-out period (that is what our paper top does) for the first few days of growing microgreens. Our top paper mimics placing soil over the top of your seeds as you'd typically do if you were planting outside :D The weighted black-out period is crucial for two reasons - holding the seeds in place and shielding them from light. Holding the seeds down helps keep the seeds in close contact with the moist coconut mat & encourages the seeds to send their roots downward, deeper into the coconut mat. The darkness is important for the first few days so the seeds can germinate, root deeply, and grow to a point where they're ready to start photosynthesis. At the beginning phase, light can actually disrupt the chemical reactions necessary for the seed to begin to grow! If you use grow lamps / supplemental lighting, avoid using until you peel the top paper back. *If you notice that your greens are "leggy," it may be due to your lighting. Even though microgreens grow just fine in low light (natural indirect or house lighting), they do still need a sufficient amount for several hours a day. If they are in darkness, have insufficient lighting, or the main light source is far away, they will stretch to seek out that light source. The longer they stretch, the weaker and leggier they will become. 5. OBSERVE MORE OFTEN During the colder months, it may be worthwhile to take a peek at your microgreens daily if possible. Each Seed Quilt is different and may require slightly different care. Check water level - You want to keep the coconut mat moist, but not wet. After properly soaking the Seed Quilt, the water level should stay around the top of the tray’s bottom ribs or middle of the brown coconut mat. Never fill the water line beyond that after setup. Ensure your plant babies have adequate warmth, light and air circulation. Keep the grow tray away from other plants or fruit Check for signs of germination by days 3-4. Act quickly if your greens start wilting over just add a cup of water and they’ll perk right up! Harvest at maturity by cutting them at the base and storing them in a container in the refrigerator! They will last up to 10 days like that. We hope this helps with growing your greens this Winter! As always, reach out to us or comment below at any time for growing support! Happy Growing! START EATING MORE GREENS TODAY GROW MICROGREENS NOW